Skip to content
GET A FREE CTA T-SHIRT WHEN YOU SPEND $200! Add T-Shirt to cart to receive automatic discount.

Country

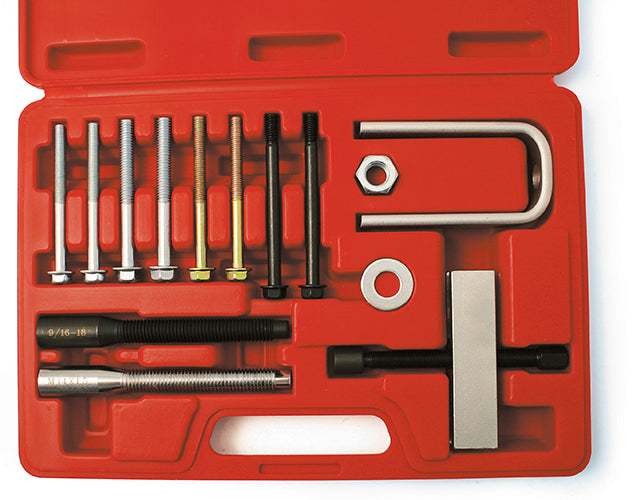
1500 - Steering Wheel & Lock Plate Service Kit

SKU 1500
Original price $89.95 - Original price $89.95
Original price
$89.95
$89.95 - $89.95
Current price $89.95

Orders placed before 12:00pm EST Mon-Fri ship same day. Orders placed after 12:00pm EST ship next business day.

  • Services most steering wheels, including telescopic tilt columns
  • Includes:
    • 4 sets of cap screws
    • 2 yokes
    • Metric & SAE lock plate adapters and washers
  • A must for removing/installing steering wheel lock plate for directional signal switch replacement or other steering column repairs.
  • Use on all late model GM products, Chrysler products with tilt wheel, and some AMC vehicles.
  1. Remove the steering wheel retaining nut and the steering wheel. If there is no master spline, carefully mark its position on the shaft.

CAUTION: Do not hammer or otherwise the use of force on the steering column as it is designed to collapse on impact.

  1. Choose the correct thread size and thread the tool as far as possible onto the steering shaft.
  2. Place the “U” shaped part of the tool squarely against the lock plate.
  3. Holding the tools plastic handle, turn the wing nut clockwise until the lock plate has been depressed enough to allow removal of the retaining ring.
  4. After removing the retaining ring, turn the wing nut counterclockwise until the spring under the lock plate is fully extended and the plate is free, then remove the tool.
  5. When the directional signal switch or other repair is completed, use the tool as above to depress the lock plate against its spring and install the retaining nut.
  6. Install the steering wheel and the retaining nut.

STEERING WHEEL PULLER

  • A must for removing the steering wheel for the replacement or to repair the directional signal switch, horn contacts, etc.
  • Will not damage steering wheel or column.

INSTRUCTIONS:

  1. Disconnect the battery ground cable.
  2. Remove the horn button or ring. On some cars this is done by pressing down and rotating it counterclockwise. On others, it may be necessary to remove screws or nuts.
  3. Remove the nut that holds the wheel to the steering shaft.
  4. Using paint or a center punch, mark the position of the steering wheel on the shaft.
  5. Select the puller bolts that thread easily into the holes in the base of the steering wheel.
  6. Thread the puller screw through the puller nut, then place the tip on the screw. Mount the puller so that the tip bears on the steering shaft and the bolts go through the puller slots into the steering wheel base.
  7. Turn the puller screw until the steering wheel breaks free of the steering shaft.

CAUTION: During reinstallation, be certain the steering shaft nut is properly tightened. Use locking compound on the threads for extra safety.

Interchange

7927A

  • Services most steering wheels, including telescopic tilt columns
  • Includes:
    • 4 sets of cap screws
    • 2 yokes
    • Metric & SAE lock plate adapters and washers
  • A must for removing/installing steering wheel lock plate for directional signal switch replacement or other steering column repairs.
  • Use on all late model GM products, Chrysler products with tilt wheel, and some AMC vehicles.
  1. Remove the steering wheel retaining nut and the steering wheel. If there is no master spline, carefully mark its position on the shaft.

CAUTION: Do not hammer or otherwise the use of force on the steering column as it is designed to collapse on impact.

  1. Choose the correct thread size and thread the tool as far as possible onto the steering shaft.
  2. Place the “U” shaped part of the tool squarely against the lock plate.
  3. Holding the tools plastic handle, turn the wing nut clockwise until the lock plate has been depressed enough to allow removal of the retaining ring.
  4. After removing the retaining ring, turn the wing nut counterclockwise until the spring under the lock plate is fully extended and the plate is free, then remove the tool.
  5. When the directional signal switch or other repair is completed, use the tool as above to depress the lock plate against its spring and install the retaining nut.
  6. Install the steering wheel and the retaining nut.

STEERING WHEEL PULLER

  • A must for removing the steering wheel for the replacement or to repair the directional signal switch, horn contacts, etc.
  • Will not damage steering wheel or column.

INSTRUCTIONS:

  1. Disconnect the battery ground cable.
  2. Remove the horn button or ring. On some cars this is done by pressing down and rotating it counterclockwise. On others, it may be necessary to remove screws or nuts.
  3. Remove the nut that holds the wheel to the steering shaft.
  4. Using paint or a center punch, mark the position of the steering wheel on the shaft.
  5. Select the puller bolts that thread easily into the holes in the base of the steering wheel.
  6. Thread the puller screw through the puller nut, then place the tip on the screw. Mount the puller so that the tip bears on the steering shaft and the bolts go through the puller slots into the steering wheel base.
  7. Turn the puller screw until the steering wheel breaks free of the steering shaft.

CAUTION: During reinstallation, be certain the steering shaft nut is properly tightened. Use locking compound on the threads for extra safety.